4:00 PM


Getting Started
A couple of years back, I built my first pergola in the back yard that turned out surprisingly successful. Ah! I love the smell of fresh cedar. Creating something is a wonderful experience - after all, its an art that we share with the Gods! However, working with the right tools can make it a pleasant experience - certainly, a jig saw and 7.2 V cordless drill won't be sufficient for all jobs.
Recently, I got a splurge of motivation (and some time!) to get back to learning wood working and invested in a portable circular saw and a hand held router. Suddenly, the thought of having a 6000 rpm machine in your hand makes you more powerful but I soon found out that this "portable" power came at the cost of accuracy. A variety of jigs and tricks can be used in most cases to make straight cuts, but a real table saw and router table can make this much simpler.
Build or Buy
Simple enough, but my dilemma was to build or buy. Here is the reasoning:
- I like the convenience of my portable tools (router and circular saw) - therefore, I need a design that I can easily attach the tool to the work table (and detach), as required. I certainly didn't want to duplicate my devices for the same end objectives.
- Commercial table saws and router tables can get quite expensive and often are sold separately. This will add both cost and space for storage.
- Finally, if I had to buy at least I would like to have first hand experience of what I need to look for. Therefore, this has to come much later after I've made several cuts in a table saw and router table.
I decided to build a portable 3-in-1 workbench / table saw / router table combo and convert the hand tools to more functional forms. Here's the final product (not an epitome of elegance, but quite functional):

Design
OK, the decision was made to build. The next key question was "design". It really made me think how to put together a functional table and appreciate better how a table saw and router worked.
What do I need to consider for design?
How big should the table be?
How can I attach/detach my power tools?
What can I reasonably achieve with my limited tools?
What pitfalls should I avoid?
What kind of fence should I use?
There are plenty of free (and paid) plans, videos, discussion forums and how-to articles available on the web. However, I think one has to pick and choose the right features that you need.
These were my design parameters:
- Simple design that I can pull off quickly
- Compact, mobile table that fits in my garage
- House both circular saw and router with ample working surface
- Attach/detach tools easily
- Keep costs low but not compromise ease of use, quality or user experience
I've tried to capture some tips and pitfalls along the way in case someone wants to improvise.
Plan
Plan
Coming up with a plan is essential to achieve anything - the work table is no exception. Here's a Sketchup 3D plan of my design that I tinkered with until I had most of the elements worked out.


Materials
All my materials came from local hardware stores (Lowes or Home Depot).
Wood
(1) A - 3/4"D x 24"W x 48"L laminated MDF for table surface
(1) B - 3/4"D x 24"W x 48"L MDF for bottom shelf
(4) C - 4"D x 4"W x 30"L lumber for table legs
(4) D - 2"D x 4"W x 44"L lumber for frame
(4) E - 2"D x 4"W x 24"L lumber for frame
(2) F - 3/4"D x 24"W x 20"L laminated MDF for fence
(2) F - 3/4"D x 24"W x 20"L laminated MDF for fence
Fasteners & Accessories
(8) G - 3/8" x 6"L bolts, nuts and washers
(2) H - 1/2" x 2-1/2"L bolts, nuts and washers
(2) H - 1/2" x 2-1/2"L bolts, nuts and washers
(1) I - Toggle clamp
(16) J - 2-1/2"L screws
(8) K - 1-1/2" screws
(16) L - 1" screws
(4) M - 2" Casters
(2) N - 36" Adhesive fishing ruler tape
(1) O - Power strip
Total Cost: $70
(16) L - 1" screws
(4) M - 2" Casters
(2) N - 36" Adhesive fishing ruler tape
(1) O - Power strip
Total Cost: $70
Step 1 - Mark up and cut the lumber (C, D, E) to dimensions.
Step 2 - Its easier to build it upside down. Lay down D and E on the ground to form a rectangle. Check if they make square inner corners and screw them together to form the frame.
Step 3 - Place C (4" x 4" legs) vertically at each corner and check if they're square before clamping them together. Drill 3/8" hole through D and C and fasten with bolts (G). Screw E and C together with 2-1/2"L screws (I). Repeat for all four legs.
Step 4 - Attach the 2" casters (M) while the frame is still on the ground. Flip the frame for the rest of the work. With the wheels on, its easy to move it around.
Step 5 - Mark 6" from the ground on each leg and clamp the remaining D and E pieces to the legs (C) - one at a time. Drill 3/8" hole through D and C and fasten with bolts (G). Screw E and C together with 2-1/2"L screws (J). Repeat for all four legs.
Step 6 - Cut notches on the MDF board (B) at the corners with the jig saw and place it on the bottom frame. Screw in the MDF board (B) to D and E with 1" screws (L).
Before attaching the top surface, we need to make the necessary openings to attach the router and circular saw. Here's where different routers and circular saws will require custom solutions.

Step 7 - Attaching the router
I decided to keep it simple without having to cut insert plates or tinker with leveling screws for keeping the top surface flush for the work pieces.
On the Skil router, it was a simple solution. Just remove the base plate from the fixed base and mark up the openings on the underside of the laminated MDF board (A). Drill holes through and counter-sink on the top surface. Insert bolts from the top to fix the router snugly.
Mark the opening for the bit and use a plunge router to cut a square in the laminated MDF (A).
As a result, my fixed base is attached (rather) permanently to the table with the bolts. This allows marking up measurements on the table for repeated cuts. I can easily insert the router and lock in place as necessary, with the flexibility of still detaching it to use with my plunge router base. I simply tied the router switch in ON position so everything can be controlled with a power strip switch.
Tip: The main downside to this setup is that the adjustment of bit depth needs to be done under the table - a small price to pay since the insert plate concept was avoided.


Step 10 - Mark the saw blades to carefully align and stick the adhesive ruler tape (N) on either side of the laminated MDF (A). I used a fishing tape that's large, clear and water-proof. Finally attach the laminated MDF to the bench frame using 1" screws (L). Attach the power strip (O) to one of the front legs and plug in the router or circular saw, as required.

Voila! The portable 3-in-1 workbench / table saw / router table is ready to use!
Tip: The ruler tape should be fixed at the end, so any errors in squaring up edges and blades can be simply corrected by a little offset of the tape at both ends.
Additional Ideas:
1. There's still enough room to attach a vise to the workbench.
2. Attach a jig saw and convert it into a band saw station (4-in-1 for small spaces).
3. Create a small port on the fence and attach a shop-vac to control dust.
Step 2 - Its easier to build it upside down. Lay down D and E on the ground to form a rectangle. Check if they make square inner corners and screw them together to form the frame.
Step 3 - Place C (4" x 4" legs) vertically at each corner and check if they're square before clamping them together. Drill 3/8" hole through D and C and fasten with bolts (G). Screw E and C together with 2-1/2"L screws (I). Repeat for all four legs.
Step 4 - Attach the 2" casters (M) while the frame is still on the ground. Flip the frame for the rest of the work. With the wheels on, its easy to move it around.
Step 5 - Mark 6" from the ground on each leg and clamp the remaining D and E pieces to the legs (C) - one at a time. Drill 3/8" hole through D and C and fasten with bolts (G). Screw E and C together with 2-1/2"L screws (J). Repeat for all four legs.
Step 6 - Cut notches on the MDF board (B) at the corners with the jig saw and place it on the bottom frame. Screw in the MDF board (B) to D and E with 1" screws (L).
Before attaching the top surface, we need to make the necessary openings to attach the router and circular saw. Here's where different routers and circular saws will require custom solutions.

Step 7 - Attaching the router
I decided to keep it simple without having to cut insert plates or tinker with leveling screws for keeping the top surface flush for the work pieces.
On the Skil router, it was a simple solution. Just remove the base plate from the fixed base and mark up the openings on the underside of the laminated MDF board (A). Drill holes through and counter-sink on the top surface. Insert bolts from the top to fix the router snugly.
Mark the opening for the bit and use a plunge router to cut a square in the laminated MDF (A).
As a result, my fixed base is attached (rather) permanently to the table with the bolts. This allows marking up measurements on the table for repeated cuts. I can easily insert the router and lock in place as necessary, with the flexibility of still detaching it to use with my plunge router base. I simply tied the router switch in ON position so everything can be controlled with a power strip switch.
Tip: The main downside to this setup is that the adjustment of bit depth needs to be done under the table - a small price to pay since the insert plate concept was avoided.


Step 8 - Common Fence
A common fence for both the router and table saw can be used with careful planning.
(i.) Cut F into two pieces - 12"L and 8"L.
(ii.) On the 12"L piece, mark up 3" on either side and use a plunge router to drill 1/2" notches about 8" long.
(iii.) Position the 12"L piece on the laminated MDF (A) lining up one end of the notch and drill 1/2" hole through A.
(iv.) Cut a square notch on the long edge on both 12"L and 8"L pieces. This creates clearance for the bit to move the cut pieces and optionally attach a shop-vac.
(v.) Attach 8"L piece square to the 12"L piece, lining up the two notches. I used both glue and countersinked screws.
(vi.) Use 1/2" bolts (H) to attach the fence to the laminated MDF board (A).
Tip: In any fence design, moving one end away from the blade or bit doesn't guarantee the other end has moved the same distance. Therefore, its best to mark up both ends to check if the fence is parallel to the blade or bit.
While this fence is quite sturdy and smooth, I decided to create another lightweight fence for smaller jobs.
(i.) Mark up and cut 2" x 2" stocks to 3 pieces - 48"L, 6"L and 6"L.
(ii.) Glue and screw the pieces square to form a simple fence as shown below.
(iii.) Drill 1/4" holes through 6"L pieces and use 1/4" knobs to fix the fence at desired stops.


Step 9 - Attaching the circular saw
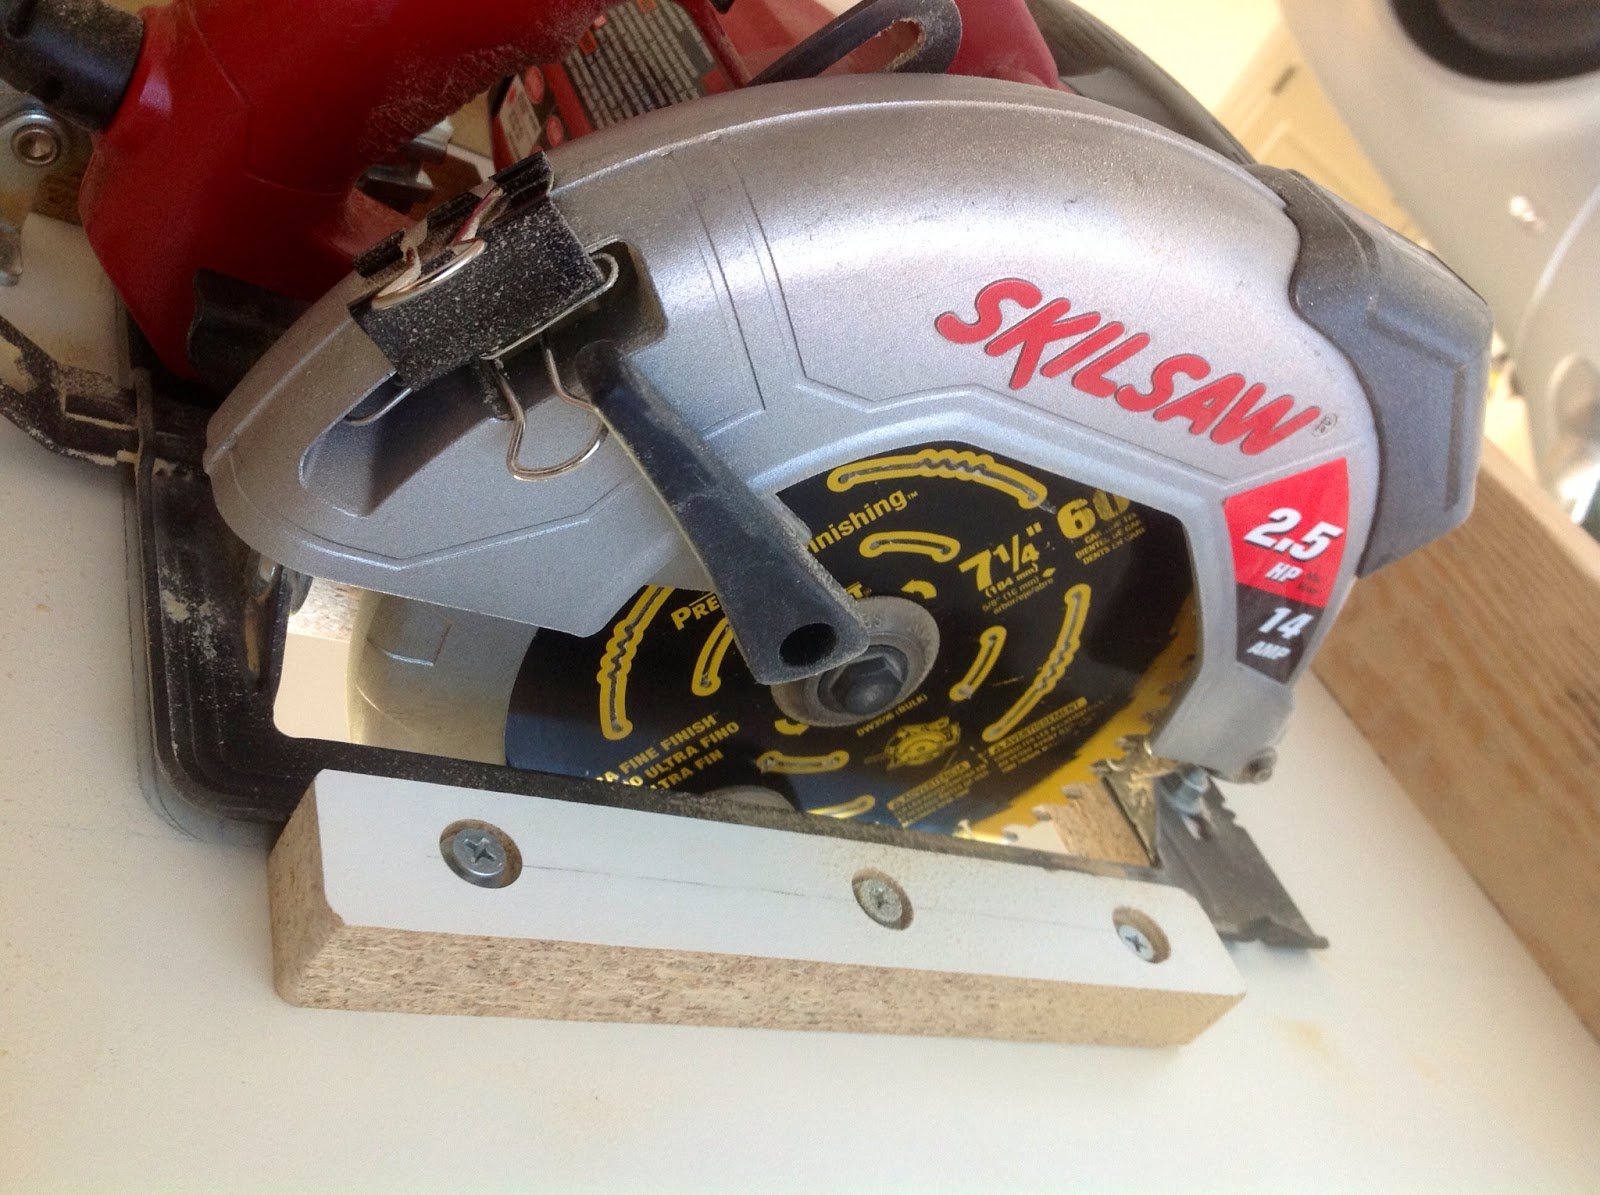
On the Skil circular saw, it wasn't as straightforward as the router. I attached a scrap piece along one of the edges as a stop to guide the saw. I used a combination of bolts and a toggle clamp to secure the table saw in place. Attaching and detaching the circular saw is a breeze now and the stops provide the same fit every time.
Mark the opening for the blade and use a plunge router to cut a rectangle in the laminated MDF (A).
The retractable blade guard is quite handy above the table and allows safe operation. Again, I simply tied the circular saw switch to the ON position to control everything from the power strip switch.
Tip: The main downside to this setup is that the depth of cut and bevel needs to be adjusted under the table - a small price to pay since the insert plate concept was avoided.


Step 10 - Mark the saw blades to carefully align and stick the adhesive ruler tape (N) on either side of the laminated MDF (A). I used a fishing tape that's large, clear and water-proof. Finally attach the laminated MDF to the bench frame using 1" screws (L). Attach the power strip (O) to one of the front legs and plug in the router or circular saw, as required.

Voila! The portable 3-in-1 workbench / table saw / router table is ready to use!
Tip: The ruler tape should be fixed at the end, so any errors in squaring up edges and blades can be simply corrected by a little offset of the tape at both ends.
Additional Ideas:
1. There's still enough room to attach a vise to the workbench.
2. Attach a jig saw and convert it into a band saw station (4-in-1 for small spaces).
3. Create a small port on the fence and attach a shop-vac to control dust.