Had this painting for some time bought by wife from Vietnam which is very famous for its oil paining art.
As the painting came in a role the first job was to stretch the canvas on the frame. For this I used 1.5" x 24mm plywood beading , it was created by gluing together two 12mm plywood strips. I used a basic tacker to stretch the Canvas . The best way is to start tacking from the centre of frame and move towards the corners. Doing this makes the canvas stretch properly without any sagging.
 |
| Cutting thin Plywood pieces 12mm x 12mm |
 |
| Testing on small piece |
The painting was fairly large of about 31" x 31" dimension. I wanted the framing to be cost effective yet innovative so decided to use Plywood. I have used 12mm plywood and red Sal beading to make the frame.
My initial plan was to buy a wooden board and cut my own beading from it, but on enquiring with the local timber yard I discovered that the beading costs less then buying a plank .
The cost of the beading was Rs 2 /ft which is very cheap as red Sal costs Rs1450 per cubic feet.
Beading that was available was 28mm wide and I needed 45mm for the frame so had to cut and glue two of them together to get the desired thickness. For this I used my table saw.
 |
| Gluing plywood pieces |
The plywood which I have used was a commercial grade, cost was Rs 56 /feet. It was cheap and have lot of imperfections.
As you can see from the above image the plywood strips have lot of gaps, so have to do quite a bit of hole filling and sanding.
I have used my trim router mounted on a base with round over bit to round the corners of the beading.
 |
| Holes filled and sanded |
 |
| Rabbet cut on table saw |
 |
| Rounding edges on router |
 |
| Gluing edge beading |
Cutting through table saw makes thing much easier and most importantly under control. I would suggest before you get into serious wood working make sure you have a good table saw setting.
I have converted one of my old table to Table saw. I will be will be covering the process of making the table saw through another post as I am still working on it.
Below is the picture of 45° cut through table saw.
 |
| Cutting miter on table saw |
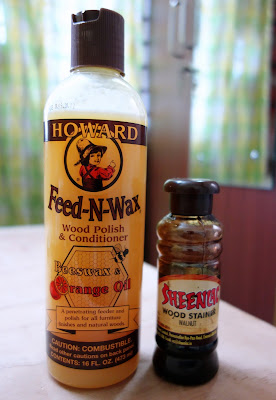
The last and the most important part was finishing. I used a Wood stain and then the final finishing through bee wax along with orange oil. This bee wax is from Indonesia but I am sure locally also wax polishes will be available. If you cannot find Bee wax you can also use lacquer.
 |
| Polish and stain |
I also framed the below set of paintings through a much simpler process. I used Teak beading 1cm for the frame and used stain and Shellac for finishing.
You can choose the side boarder width depending upon the need of your painting.
Go ahead and frame something a painting , a picture or any kind of art.
Feel free to check with me if any doubt...All the Best!


.JPG)

0 comments:
Post a Comment
Note: Only a member of this blog may post a comment.